Wednesday, December 26, 2018

Master DNS Configuration Linux step by step guide RHEL 7 / Centos 7

Master DNS, Domain name system. DNS major role is to convert human-readable domain names to machine known numbers (IP Address). World resource connected to the internet or a private network by decentralized naming system. Master DNS configuration Linux Step by Step Guide.
The Domain Name System delegates the responsibility of assigning domain names and mapping those names to Internet resources by designating authoritative name servers for each domain. Network administrators may delegate authority over sub-domains of their allocated namespace to other name servers. This mechanism provides distributed and fault tolerant service and was designed to avoid a single large central database.
Based on the working method types of DNS are there, few are mentioned below

  1. Primary / Master DNS
  2. Slave DNS
  3. Forwarding DNS
  4. Caching DNS
  5. Authoritative-Only DNS

Primary/master DNS and Slave DNS Servers

Given the importance of DNS in making services and entire networks accessible, most DNS servers that are authoritative for a zone will have built-in redundancy. There are various terms for the relationships between these servers, but generally, a server can either be a master or a slave in its configuration.
Both master and slave servers are authoritative for the zones they handle. The master does not have any more power over the zones than the slave. The only differentiating factor between a master and a slave server is where they read their zone files from.
A master server reads its zone files from files on the system’s disk. These are usually where the zone administrator adds, edits, or transfers the original zone files.
The slave server receives the zones that it is authoritative for through a zone transfer from one of the master servers for the zone. Once it has these zones, it places them in a cache. If it has to restart, it first checks its cache to see if the zones inside are up-to-date. If not, it requests the updated information from the master server.

Forwarding DNS Server

This approach adds an additional link in the chain of DNS resolution by implementing a forwarding server that simply passes all requests to another DNS server with recursive capabilities (such as a caching DNS server).
The advantage of this system is that it can give you the advantage of a locally accessible cache while not having to do the recursive work (which can result in additional network traffic and can take up substantial resources on high traffic servers). This can also lead to some interesting flexibility in splitting your private and public traffic by forwarding to different servers.

Caching DNS Server

A caching DNS server is a server that handles recursive requests from clients. Almost every DNS server that the operating system’s stub resolver will contact will be a caching DNS server.
Caching servers have the advantage of answering recursive requests from clients. While authoritative-only servers may be ideal for serving specific zone information, caching DNS servers are more broadly useful from a client’s perspective. They make the DNS system of the world accessible to rather dumb client interfaces.

Authoritative-Only DNS Server

An authoritative-only DNS server is a server that only concerns itself with answering the queries for the zones that it is responsible for. Since it does not help resolve queries for outside zones, it is generally very fast and can handle many requests efficiently.

A Few DNS Records 


A = Address record
PTR  = Pointer record
NS = Name service / server
MX = Mail Exchanger
SOA = State of Authority
CNAME =    Canonical name / Alias Name

Master DNS Server Profile

  • Packages Required   :  bind*
  • Version    :  9
  • Daemon  : named
  • Config File  : /var/named/chroot/etc/named.conf         /var/named/chroot/etc/named.rfc1912.zone
  • Default zone files location :         /var/named/chroot/var/named/
  • Port Number  : 53
[root@sever1 ~]# yum install bind*
(bind* = bind, bind-chroot, bind-dyndb-ldap, bind-libs, bind-pkcs11, bind-pkcs11-libs, bind-pkcs11-utils, bind-utils)
First, start named-chroot before named.service because it will generate config files
[root@server1 ~]# systemctl enable named-chroot.service
[root@server1 ~]# systemctl start named-chroot.service
[root@server1 ~]# systemctl enable named.service
[root@server1 ~]# systemctl start named.service
[root@server1 ~]# vim /var/named/chroot/etc/named.conf

options {
        listen-on port 53 { 127.0.0.1; 192.168.4.128; };
        listen-on-v6 port 53 { ::1; };
        directory       "/var/named";
        dump-file       "/var/named/data/cache_dump.db";
        statistics-file "/var/named/data/named_stats.txt";
        memstatistics-file "/var/named/data/named_mem_stats.txt";
        allow-query     { localhost; 192.168.4.0/24; };
(Default line number is 10-17) As shown above, enter your DNS server IP address (which is your server address) and network address which network you want to provide DNS service.
Now edit the zones configuration file
[root@server1 ~]# vim /var/named/chroot/etc/named.rfc1912.zones

### Zones Start Here  ####
zone "vamsi.com" IN {
        type master;
        file "vamsi.for.zone";
        allow-update { none; };
};

zone "4.168.192.in-addr.arpa" IN {
        type master;
        file "vamsi.rev.zone";
        allow-update { none; };
};

#### Zoned Ended Here ####
as shown above copy the zone configuration lines (Default line numbers from 19 to 23) and paste there itself. copy the Reverse zone configuration line  (Default line number 31 to 35) and paste there itself. Now modify the copied lines as per your requirement ( which are in pink color).
zone “vamsi.com” IN {  in this line whatever the domain name you would like to configure mention that
file “vamsi.for.zone”;  file name whatever the file name you want you can give
zone “4.168.192.in-addr.arpa” IN { in this line write your IP address in reverse way
file “vamsi.rev.zone”; file name whatever the file name you would like.
Save configuration file and Exit

Creating Zone files

Forward lookup zone – forward lookup zone will convert hostname to IP address
Reverse lookup zone – reverse lookup zone will convert an IP address to  hostname
change directory path to /var/named/chroot/var/named/
copy the files as per the file names which we have mentioned in the above zones configuration file
in this example
named.local –> vamsi.for.zone
named.loopback –> vamsi.rev.zone
[root@server1 named]# cd /var/named/chroot/var/named
[root@server1 named]# cp named.localhost vamsi.for.zone
[root@server1 named]# cp named.loopback vamsi.rev.zone
[root@server1 named]# vim vamsi.for.zone 
$TTL 1D
@    IN SOA    server1.vamsi.com. root.server1.vamsi.com. (
                    0    ; serial
                    1D    ; refresh
                    1H    ; retry
                    1W    ; expire
                    3H )    ; minimum
                NS    server1.vamsi.com.
vamsi.com.             A    192.168.4.128
server1           A    192.168.4.128
As shown in above configuration server1.vamsi.com. – DNS Server Name and domain name
add NS record as DNS Server name and domain name (do not forget to add (dot) yet end)
First A record will be your domain name and DNS server IP address
[root@server1 named]# vim vamsi.rev.zone 
$TTL 1D
@    IN SOA    server1.vamsi.com. root.server1.vamsi.com. (
                    0    ; serial
                    1D    ; refresh
                    1H    ; retry
                    1W    ; expire
                    3H )    ; minimum
    NS    server1.vamsi.com.
128    PTR    server1.vamsi.com.
Note: Even do not miss single (dot) which will not start your named service

Master DNS configuration Linux Step by Step Guide

I have shown a single host record as an example if you want to add more records add them
Now change the ownership of created files to named group
[root@server1 named]# chown root:named vamsi.for.zone 
[root@server1 named]# chown root:named vamsi.rev.zone
Add a firewall rule to communicate DNS port out
[root@server1 ~]# firewall-cmd --permanent --add-service=dns
success
[root@server1 ~]# firewall-cmd --reload
success
Now restart your named service.
[root@server1 named]# systemctl restart named.service 
[root@server1 named]# systemctl status named.service
Now go to client side and add DNS server IP to /etc/resolve.conf
[root@server1 named]# vim /etc/resolve.conf
search vamsi.com
domain vamsi.com
nameserver 192.168.4.128
verify master DNS server
# nslookup vamsi.com
#dig vamsi.com
#host 192.168.4.128
#dig -x 192.168.4.128
That’s about installing and configuring the master DNS server.

Sunday, April 29, 2018

Integrating Active Directory with Linux (RHEL / CentOS)

How to Integrate RHEL 7 or CentOS 7 with Windows Active Directory

Wednesday, January 31, 2018

8 Linux ‘Parted’ Commands to Create, Resize and Rescue Disk Partitions

Parted is a famous command line tool that allows you to easily manage hard disk partitions. It can help you add, delete, shrink and extend disk partitions along with the file systems located on them. Parted has gone a long way from when it first came out. Some of it’s functions have been removed, others have been added.
Parted Command to Manage Linux Disk Partitions
In this tutorial you will learn the basics of parted and we will show you some practical examples. If you don’t have any previous experience with parted, please be aware that parted writes the changes immediately to your disk, so be careful if you try to modify your disk partitions.
If you plan on testing parted, the better option would be to simply use a virtual machine or old computer/laptop without any valuable information on it. To make modifications on a disk partition it must not be in use. If you need to work on primary partition, you may boot into rescue mode.
Note: You will need to have root access to the machine you will be working on in order to use parted.

How to Install Parted on Linux

On many Linux distributions, parted comes pre-installed. If it is not included in your distro, you can install it with:
$ sudo apt-get install parted           [On Debian/Ubuntu systems]
# yum install parted                    [On RHEL/CentOS and Fedora]
# dnf install parted                    [On Fedora 22+ versions]
Once you have make sure that parted is installed, you can proceed further to check out some real world examples of parted command in the rest of this article.

1. Check Parted Version

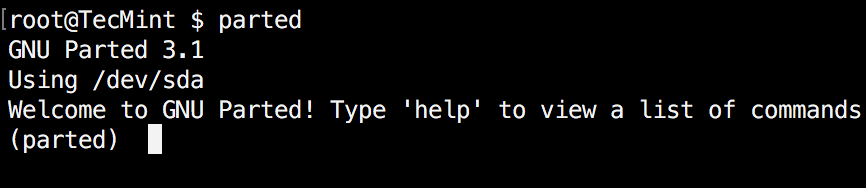
Run the following command, you see message similar to the one shown on the image below. Don’t worry if your parted version is different. Unless specified otherwise, parted will use your primary drive, which in most cases will be /dev/sda.
$ parted
Check Parted Command Version
If you want to exit parted, simply type:
$ quit

2. List Linux Disk Partitions

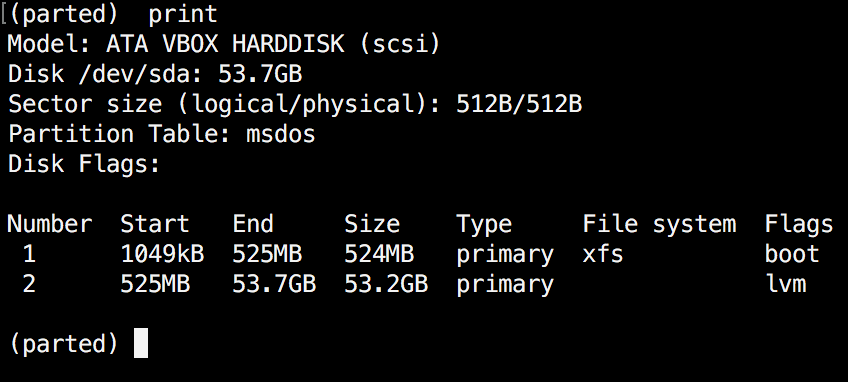
Now that parted is started, let’s list the partitions of the selected hard disk. As mentioned earlier, parted chooses your first drive by default. To see the disk partitions run print.
(parted) print
Check Linux Partitions
When running print, it will also display the hard disk information and model. Here is example from a real hard disk (not virtual as shown on the image above) :
(parted) print
Model: ATA TOSHIBA MQ01ACF0 (scsi)
Disk /dev/sda: 320GB
Sector size (logical/physical): 512B/4096B
Partition Table: msdos
Number  Start   End    Size   Type      File system  Flags
 1      1049kB  256MB  255MB  primary   ext2         boot
 2      257MB   320GB  320GB  extended
 5      257MB   320GB  320GB  logical                lvm
In the example above, you can see the disk model, capacity sector size and partition table.

3. List or Switch to Different Disk

If you have more than one hard disk, you can easily switch between disks, by using the “select” command. In the example below, I will switch from /dev/sda to /dev/sdb which is a secondary drive on my system.
To easily switch between disks you can use:
(parted) select /dev/sdX
Select Different Disk
Change "X" with the letter of the disk to which you wish to switch.

4. Create Primary or Logical Partition in Linux

Parted can be used to create primary and logical disk partitions. In this example, I will show you how to create primary partition, but the steps are the same for logical partitions.
To create new partition, parted uses “mkpart“. You can give it additional parameters like "primary" or "logical" depending on the partition type that you wish to create.
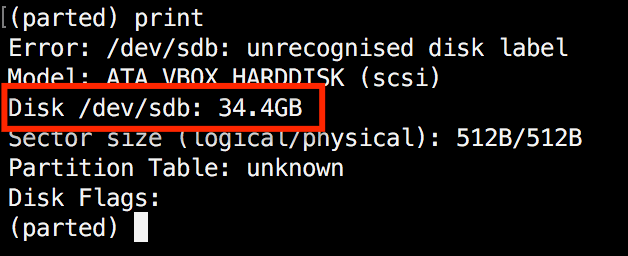
Before you start creating partitions, it’s important to make sure that you are using (you have selected) the right disk.
Start by using print:
(parted) print
Show Current Linux Disk
As shown on the above image, we are using a virtual drive of 34 GB. First we will give the new disk a label and then create a partition and set a file system on it.
Now the first step is to give the new disk a label name with:
(parted) mklabel msdos
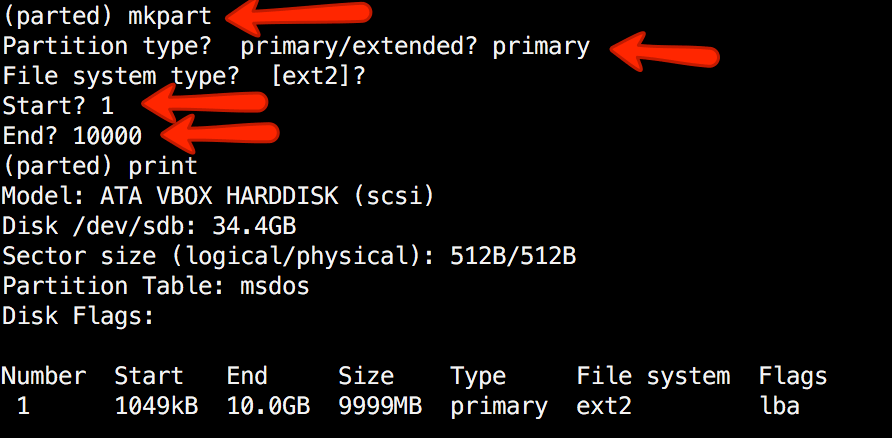
Now create the new partition with  mkpart. The listed units are in megabytes (MB). We will create a 10 GBpartition starting from 1 to 10000:
(parted) mkpart
Partition type?  primary/extended? primary
File system type?  [ext2]?
Start? 1
End? 10000
(parted) print
Model: ATA VBOX HARDDISK (scsi)
Disk /dev/sdb: 34.4GB
Sector size (logical/physical): 512B/512B
Partition Table: msdos
Disk Flags: 
Number  Start   End     Size    Type     File system  Flags
1      1049kB  10.0GB  9999MB  primary  ext2         lba
Create Primary or Logical Linux Partitions
Next,  exit parted with "quit" command. We will format our new partition in ext4 file system using mkfs. To make this happen run the following command:
# mkfs.ext4 /dev/sdb1
Note: It’s important to select the right disk and partition when executing the above command!
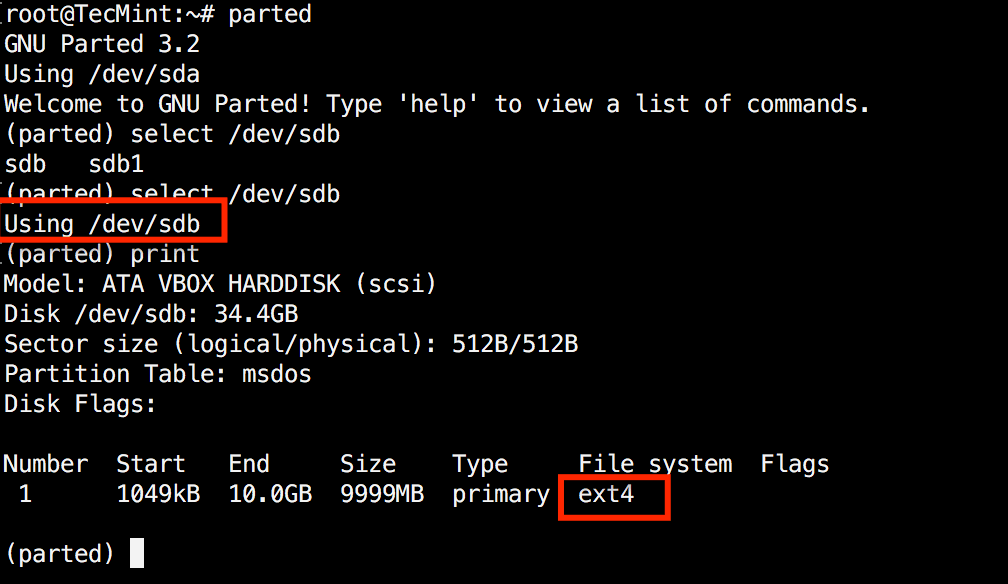
Now let’s verify our results, by printing the partition table on our secondary disk. Under file system column, you should see ext4 or the file system type that you have decided to use for your partition:
Verify Disk Partition Filesystem

5. Resize Linux Disk Partition

Parted includes multiple useful functions and one of them is "resizepart". As you have probably figured this out by now, "resizepart" helps you resize a partition.
In the example below, you will see how to resize an existing partition. For the purpose of this example, we will be using the earlier created partition.
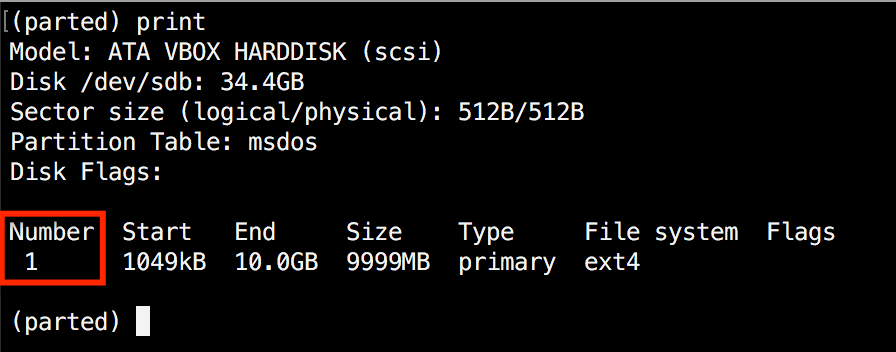
First you will need to know the number of the partition that you will be resizing. This can be easily found by using "print":
(parted) print
Find Linux Partition Number
In our example, the partition number is "1". Now run the resizepart command:
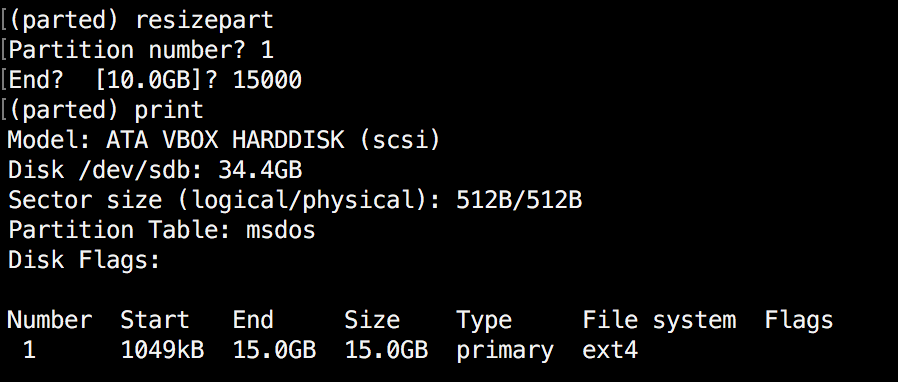
(parted) resizepart
You will be asked for the number of the partition that you will resize. Enter it’s number. After that, you will be asked to set the new ending point for this partition. Remember that by default the units are in MB. In our example, we have set the new partition size to 15 GB:
(parted) resizepart 
Partition number? 1
End?  [10.0GB]? 15000
Now verify the results with "print":
(parted) print
Verify Linux Resize Partition

6. Delete Linux Partition

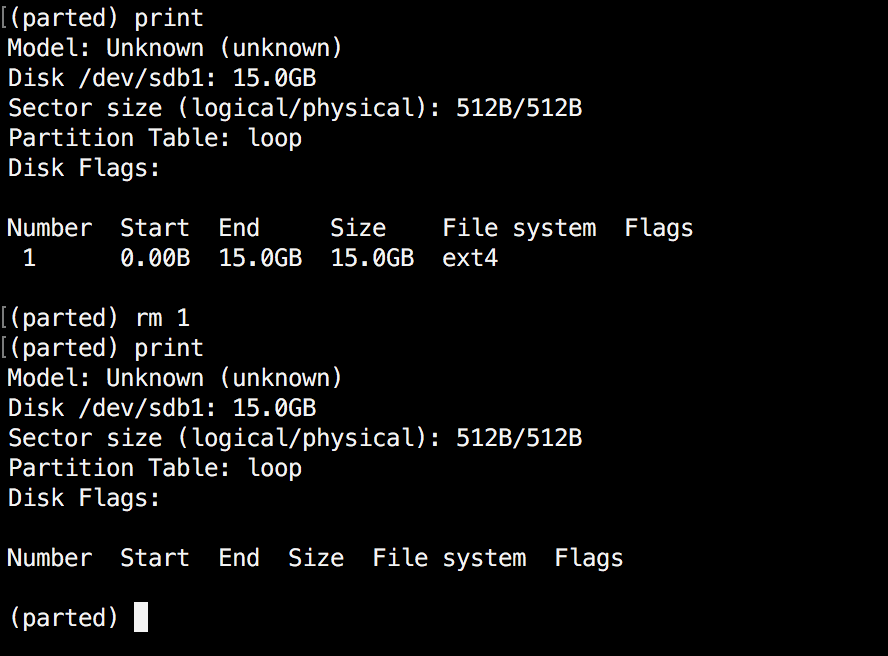
The next thing you will learn is how to delete a partition from your hard drive. To do this, you will need to use the "rm" command within parted. To delete a disk partition you will need to know it’s number.
As mentioned earlier, you can easily obtain this number by using "print". In our example, we will delete the partition with number 1 from our secondary drive /dev/sdb1:
(parted) rm 1
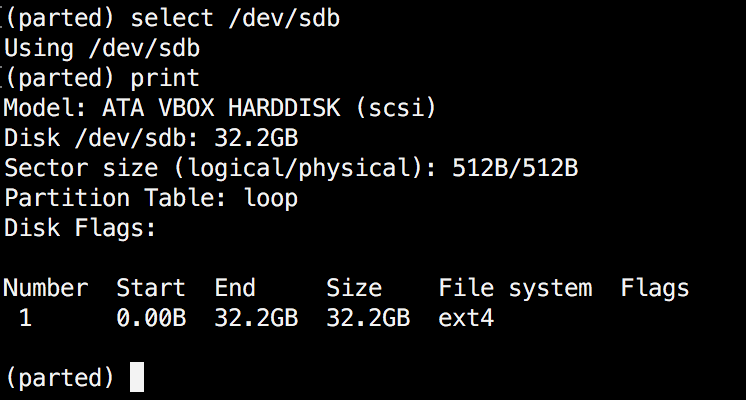
Verify the results by printing the partitions table:
Delete a Linux Partition

7. Rescue Linux Disk Partition

Parted supports a “rescue" utility that helps you recover a lost partition between a starting and ending point. If a partition is found within that range, it will attempt to restore it.
Here is an example:
(parted) rescue
Start? 1
End? 15000
(parted) print
Model: Unknown (unknown)
Disk /dev/sdb1: 15.0GB
Sector size (logical/physical): 512B/512B
Partition Table: loop
Disk Flags:
Number Start End Size File system Flags
1 0.00B 15.0GB 15.0GB ext4

8 Change Linux Partition Flag

Using parted, you can change the state of a flag for disk partitions. The supported flags are:
  1. boot
  2. root
  3. swap
  4. hidden
  5. raid
  6. lvm
  7. lba
  8. legacy_boot
  9. irst
  10. esp
  11. palo
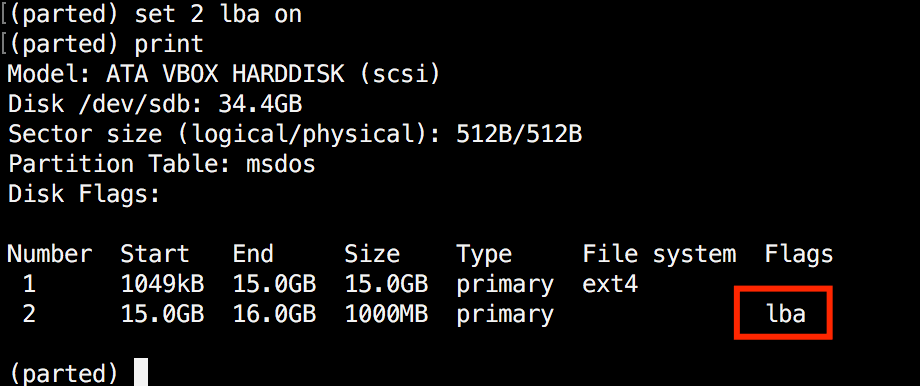
The states can be either "on" or "off". To change a flag simply run "set" command within parted:
(parted) set 2 lba on
The above command sets lba flag to on for second partition. Verify the results with print:
Change Partition Flag

Conclusion

Parted is a useful and powerful utility that can help you manage your disk partitions in Linux systems. As always, when working with disk partitions you need to be extra careful. It is strongly recommend to go through parted man pages to learn how you can customize it’s output and find more information about its capabilities.
If you have any questions or comments, please do not hesitate to use the comment section below.

Linux Tutorial - 12. Process Management

  Process Management! The wheels are in motion Introduction Linux in general is a fairly stable system. Occasionally, things do go wrong how...